CM_008 - Course Catalog - Update an Existing Course
Course Catalog - Update an Existing Course
Business Process: Course Catalog
Module: Curriculum Management
Prerequisites
Enter prerequisites here.
Instructions
Enter instructions here.
Step | Action |
|---|---|
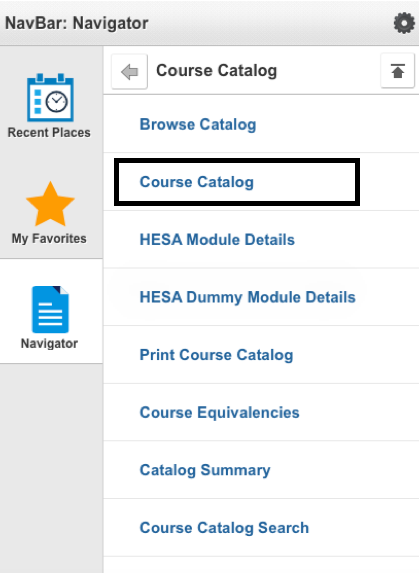
| 1. | Navigate to Curriculum Management → Course Catalog → Course Catalog. |
Step | Action |
|---|---|
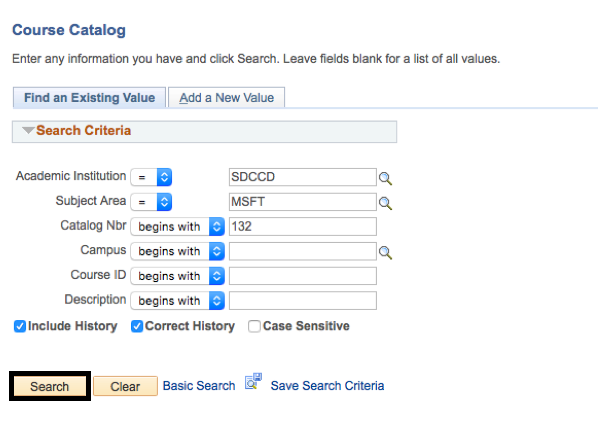
| 2. | Select "SDCCD" as the Academic Institution. |
3. | Type the information into the Subject Area. E.g. "MSFT." |
| 4. | Enter the catalog number into the Catalog Nbr field. E.g. "132." |
| 5. | Check the Include History and Correct History boxes. Checking Include History allows you see all the historical data associated with the course, which may be helpful if you need to research prior to making any updates. If the box is not selected, the system only returns the most recent effective dated rows. Note: The Correct History function will only be assigned to a super user and will not be given to all users editing and updating course catalog. |
| 6. | Click Search. |
| Step | Action |
|---|---|
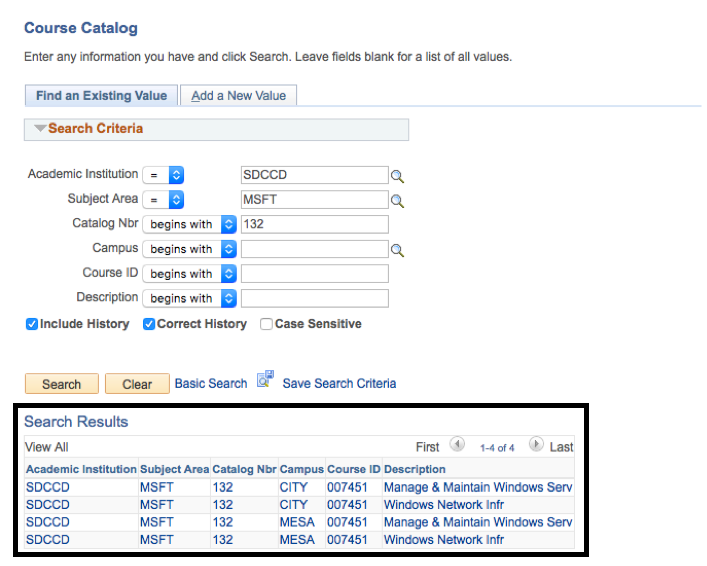
| 7. | Below the Search Criteria, the Search Results will populate. Click any field on the results to access the course. Note: It does not matter which row is selected, as the user is automatically directed to the most recent effective dated row. |
| Step | Action |
|---|---|
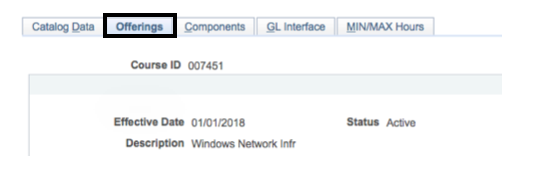
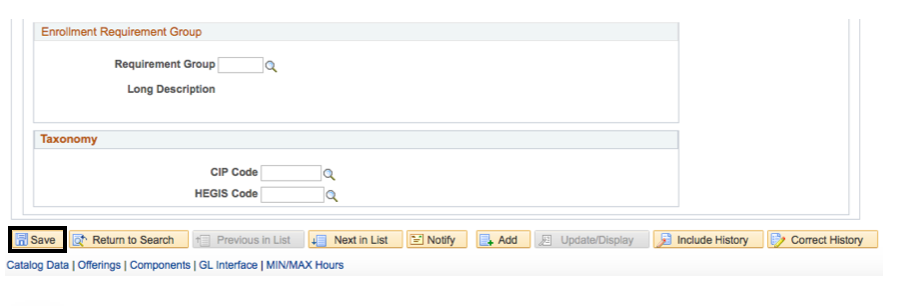
| 8. | On the Catalog Data tab, the following updates can be made:
Note: If you forgot to check the Include History and Correct History boxes, do so at the bottom of the page when the course is displayed. If you make updates and then select Correct History, you will be forced to click "No" when prompted to save changes in order to be able to select Correct History. This will cause you to lose any updates made. Checking Include History allows you see all the historical data associated with the course, which may be helpful if you need to research prior to making any updates. |
.png?version=1&modificationDate=1509674536890&cacheVersion=1&api=v2&width=600&height=428)
.png?version=1&modificationDate=1509674548752&cacheVersion=1&api=v2&width=750&height=148)
| Step | Action |
|---|---|
| 9. | Click Save. |

Step | Action |
|---|---|
10. | If all of the updates needed were on the Catalog Data page, the course catalog update is completed. If Local Attributes (control # or program applicability) need to be updated, click on the Offerings tab located to the right of the Catalog Data tab. |
Step | Action |
|---|---|
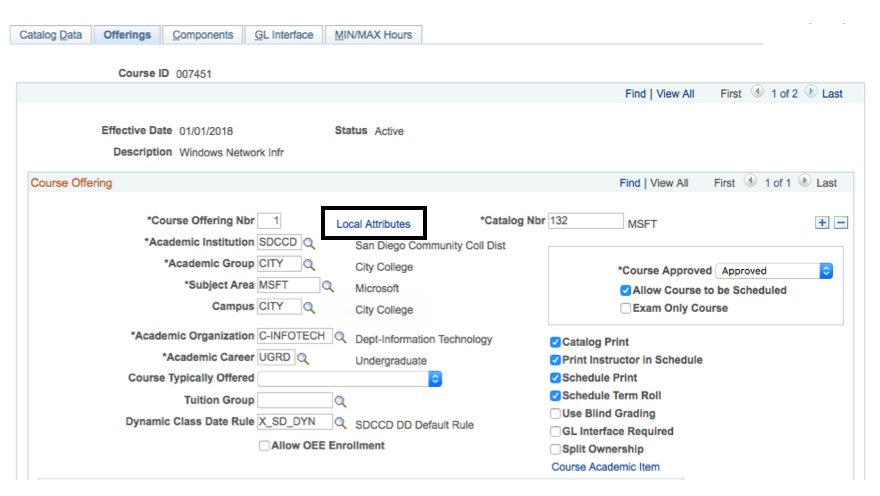
11. | Click on Local Attributes. |
Step | Action |
|---|---|
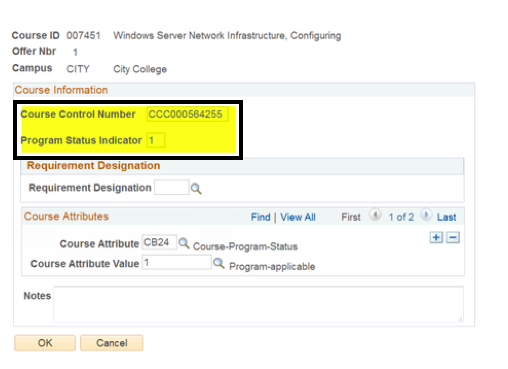
12. | Update the Course Information section by typing in the new control number in the Course Control Number field. Update the Program Status Indicator by entering "1 (program applicable)" or "2 (not program applicable)." |
Step | Action |
|---|---|
13. | In the Course Attributes section, update the Course Attribute field (if necessary) by clicking on the magnifying glass icon and selecting CB 24 (Course Program Status). Enter the same value as entered for the Program Status Indicator. |

Step | Action |
|---|---|
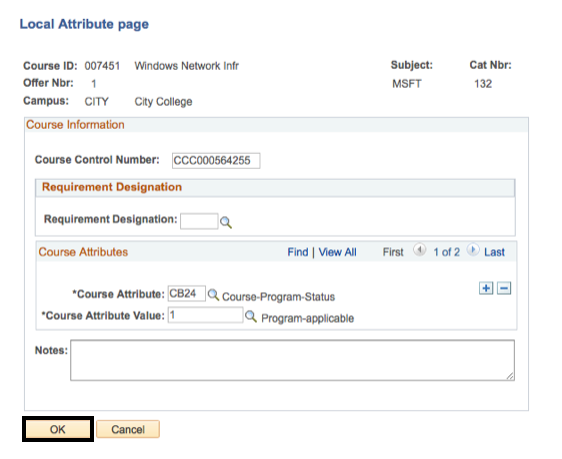
14. | Click the OK icon located at the bottom left hand corner of the screen. Note: This does not save the Local Attribute update. |
Step | Action |
|---|---|
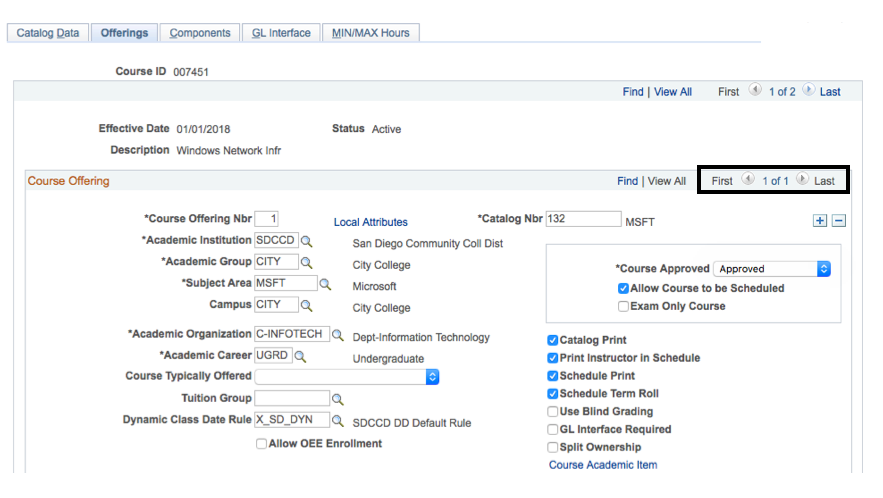
15. | You will be directed back to the Offerings tab. If there are multiple course offerings for which Local Attributes need to be updated, repeat steps 12 through 15 as necessary to update the additional offerings. If the course only has one offering, the Course Offerings First and Last will reflect 1 of 1 (offered at only one campus). If the course has two offerings, the First and Last will reflect 1 of 2 (offered at two campuses). |
Step | Action |
|---|---|
16. | Once all updates have been made to Local Attributes, click Save. |
Step | Action |
|---|---|
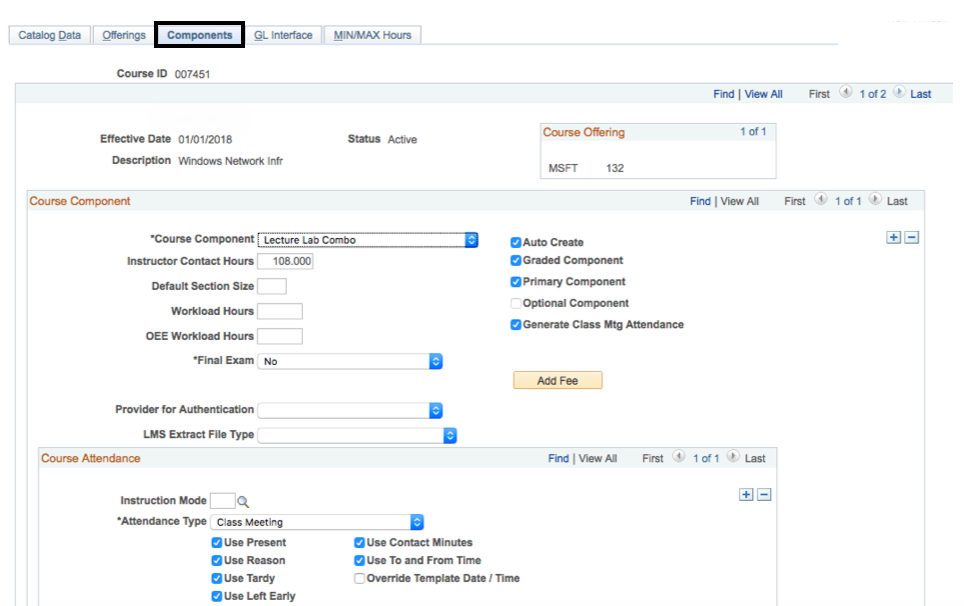
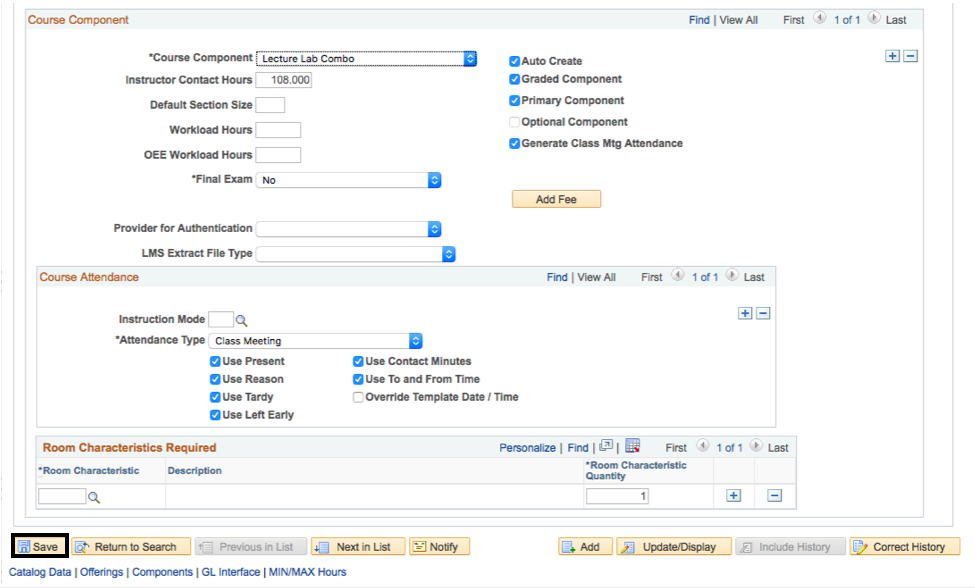
17. | If a Course Component needs to be updated, click on the Components tab. |
Step | Action |
|---|---|
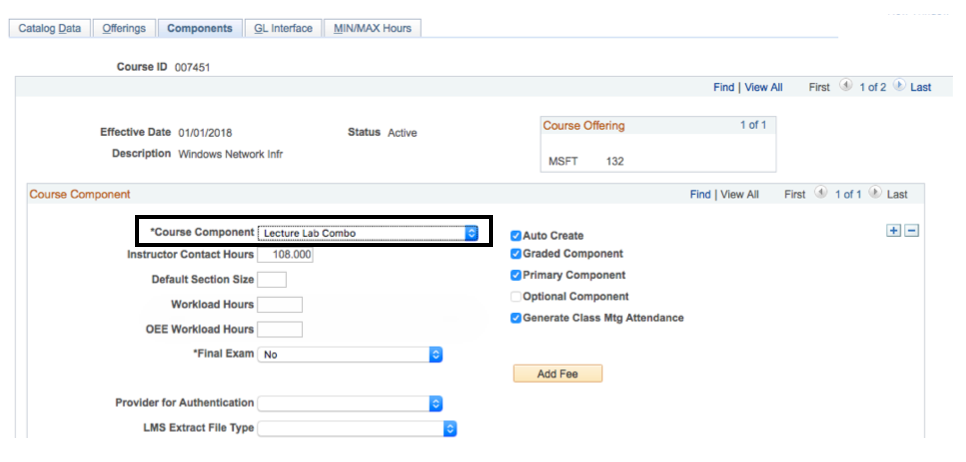
18. | Enter the appropriate lecture, lab, other hours assignment by selecting it from the Course Component drop down menu. Note: Only one component can be selected per row. To assign multiple course components, refer to the Assigning Multiple Course Components Job Aid. |
| Step | Action |
|---|---|
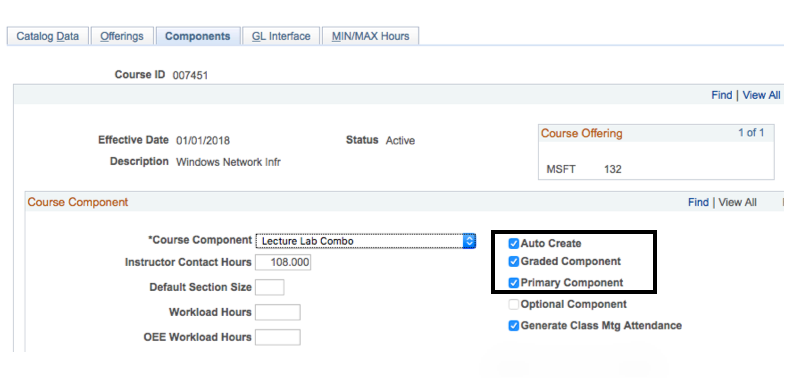
| 19. | The Auto Create, Graded Component, and Primary Component check boxes should automatically be checked. If they are not, check these boxes. |
| Step | Action |
|---|---|
| 20. | Click Save. |
Step | Action |
|---|---|
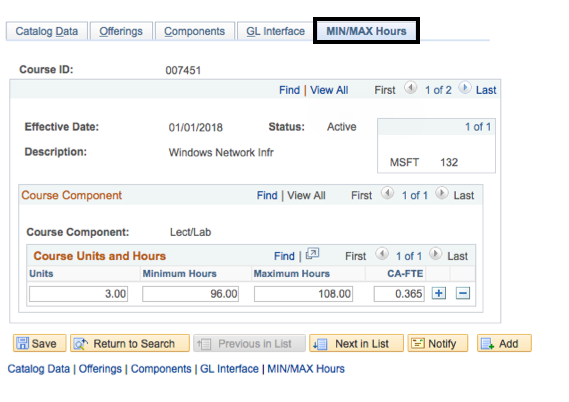
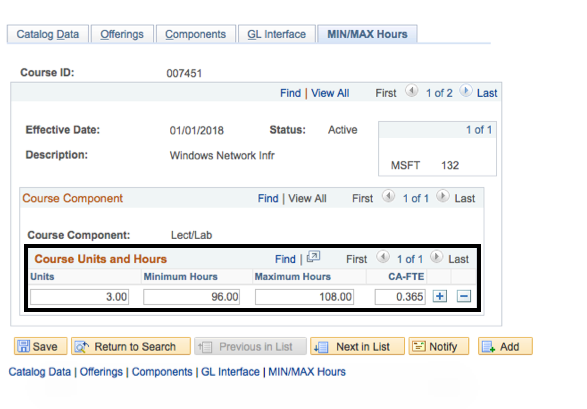
21. | If the minimum/maximum hours or instructor FTEF needs to be updated, click on the MIN/MAX Hours tab. |
Step | Action |
|---|---|
22. | The Units should be automatically populated from the Catalog Data screen. If not, enter the correct number here. Enter the appropriate Minimum Hours and Maximum Hours for the course, as well as the instructor FTEF in CA-FTE field. For variable unit courses, add multiple rows for each 0.5 unit increment. E.g. For a 1.0-3.0 unit course, there should be 5 rows: 1.0, 1.5, 2.0, 2.5, 3.0 |
| Step | Action |
|---|---|
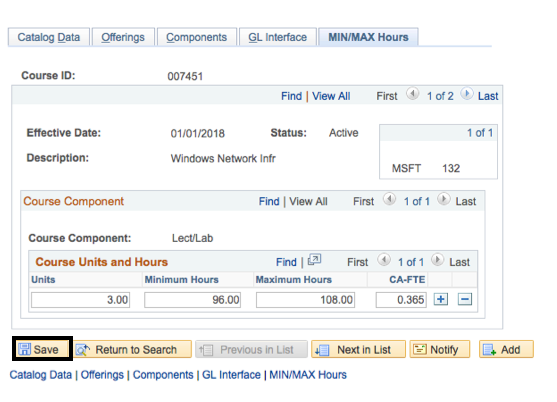
| 23. | Click Save. |
| Step | Action |
|---|---|
| 24. | End of job aid. |