CM_004 - Course Catalog - Create a New Course
Course Catalog - Create a New Course
Business Process: Course Catalog
Module: Curriculum Management
Prerequisites
Enter here.
Instructions
This job aid will go over the process necessary to create a new course on the Course Catalog.
| Step | Action |
|---|---|
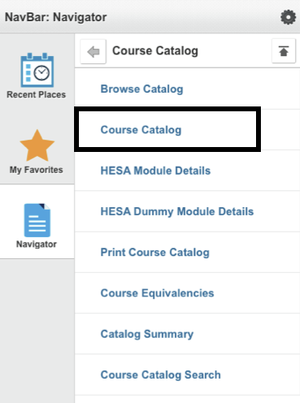
| 1. | Navigate to Curriculum Management → Course Catalog → Course Catalog. |
| Step | Action |
|---|---|
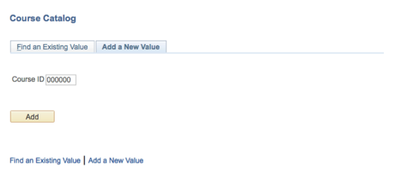
| 2. | Click on Add a New Value. The Course Number will automatically populate to "0000." Note: Do not change the value. |
| 3. | Click Add. |
| Step | Action |
|---|---|
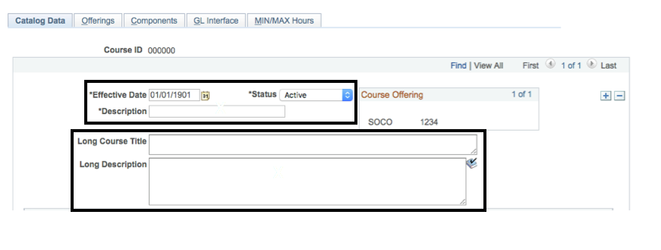
| 4. | The Catalog Data page will display. Click the magnifying glass icon next to the Effective Date and enter "1/1/1901." For a new course, two effective dated rows should be added. The first row should always be dated 1/1/1901; the 2nd row would be the start date of the first term in which the course can be scheduled. For changes to an existing course, the effective date of the change would be the start date of the first term in which the change should be reflected in the class schedule. |
| 5. | Set the Status to "Active." |
| 6. | Enter in the Description, Long Course Title, and Long Description for the new course. |
| Step | Action |
|---|---|
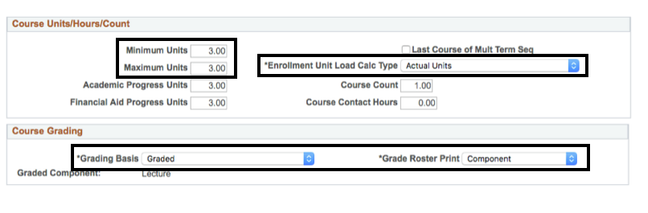
| 7. | In the Course Units/Hours/Count section, enter the following information:
Note: If the course is not for credit, indicate the units as "0." |
| 8. | In the Course Grading section, select the following information from the drop down menus:
|
| Step | Action |
|---|---|
| 9. | In the Repeat for Credit Rules section, check the Repeat for Credit box if the course is repeatable. If the course is not repeatable, skip to Step 11. |
| 10. | Enter the amount of times the class can be repeated in Total Completions Allowed. Note: "1" in the field means the course is not repeatable and can only be taken once. "2" is the mimumum value in this field. PeopleSoft will enforce BOTH the Total Units Allowed and the Total Completions Allowed limits in repeat checking processes. |

| Step | Action |
|---|---|
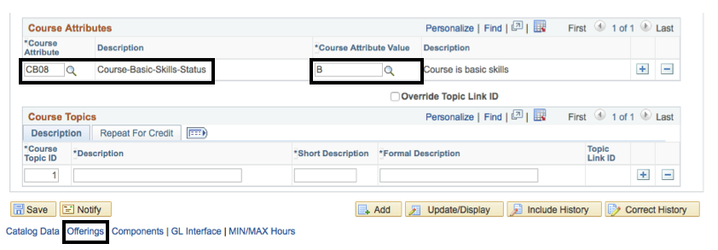
| 11. | Click the magnifying glass icon next to Course Attribute and Course Attribute Value to display a list of options and choose options from the menu. Example: "CB08" and "B," respectively. |
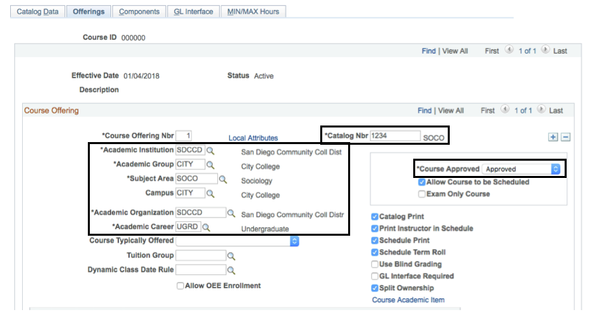
| 12. | Click on the Offerings tab either at the top or bottom of the page. |
| Step | Action |
|---|---|
| 13. | In the Course Offering section, click the magnifying glass icon and enter information into the following fields:
|
| 14. | Enter a value into Catalog Nbr. |
| 15. | Select "Approved" from the drop down menu for Course Approved. |
| Step | Action |
|---|---|
| 16. | For a new course on the row dated 1/1/1901 uncheck the following boxes:
These boxes should be checked on the row that identifies the date the course will be offered. Similarly, if a particular campus is discontinuing their offering of a course, the above items should be unchecked again. |
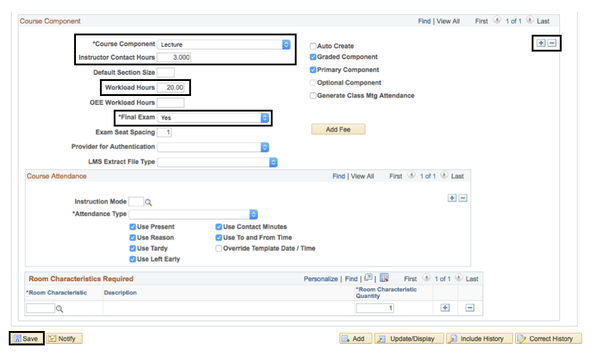
| 17. | Click on the Components tab. |

| Step | Action |
|---|---|
| 18. | In the Course Component section, enter the following information:
Note: If "Lecture Lab Combo" is the chosen Course Component, click the ( + ) sign to add the second component. Check the Auto Create and Include in Dynamic Date Calc boxes. |
| 19. | Click Save to complete the process of creating a course. |
| Step | Action |
|---|---|
| 20. | End of job aid. |