...
Records and Enrollment > Career and Program Information > Student Groups
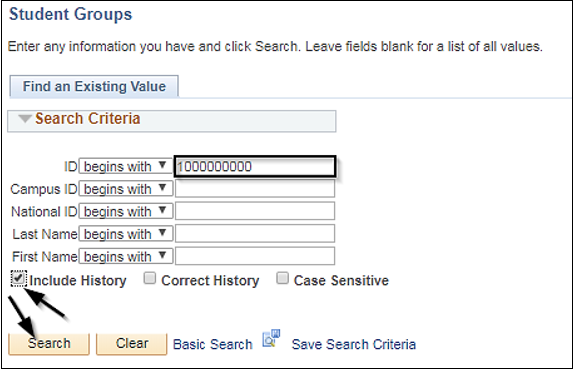
| Step | Action |
|---|
| 1. | Begin by navigating to the Navigate to → Records and Enrollment → Career and Program Information → Student Groups page. - Enter Student ID number or Name.
- Check the Include History
Click |
| Step | Action |
|---|
| 2. | From the Student Groups page, enter the following information: - The Academic Institution will default to SDCCD.
- Enter the Student Group If you already know the code, you can enter it in the box. If you do not know the code, you can use the magnifying glass to see the available options.
- Enter the appropriate Effective Date. The effective date will default to the current date. Be sure to manipulate the date per the timing of the entry of the student group. Ex: If the term has begun, use the best practice date for the effective date. If the term has not started, use the current date.
- Status will default to Active.
- Enter a Comment, if necessary or required.
- Click Save or OK (this depends on your navigation to the Student Group page).
Once you click save, the date/time the student group was posted and your User ID will populate.
NOTE: The system does not allow duplicate student groups. If student groups exist, be sure to search through the existing groups to be sure you are not duplicating. |
...