...
...
Update Student
...
Education Planner
Business Process: Selecting courses for the student educational planner
Module: Academic Advising
Navigation:
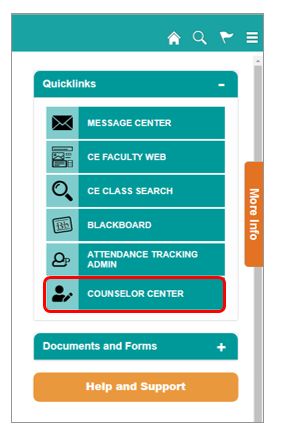
Log-in to the Faculty Portal. From the Faculty Portal click on the Counselor Center tab. This will land you on the Student Success search page.
Instructions:
This Job Aid will outline the process necessary to update the Student Educational Education Planner by Browse Catalog, Plan by Requirements and/or Manual Entry as well as how to move unassigned courses to a specific term.
Step | Action |
|---|---|
| 1. | From the Faculty Portal click on the Counselor Center tab. This will land you on the Student Success search page. |
| Step | Action |
|---|---|
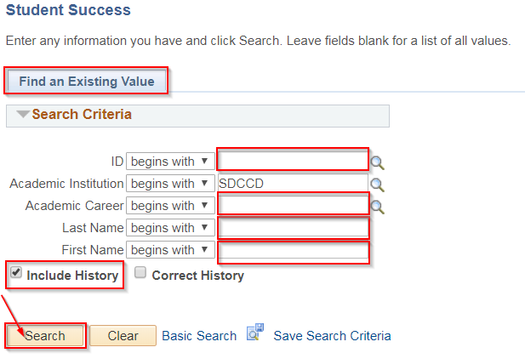
| 2. | To find the student, use “Find an Existing Value” and use the search criteria provided. Enter the Student’s ID. |
| 3. | Click on Search NOTE: If you do not know the Student’s Student ID is unknown, you the ID can search be searched using the first and last name fields. Include History box should be checked on default. If it is not, make sure to check the box. It is NOT recommended to use the magnifying glass icon to search for a student's ID as it will take a long time to load. Include History box should be checked on default. If it is not, make sure to check the box. |
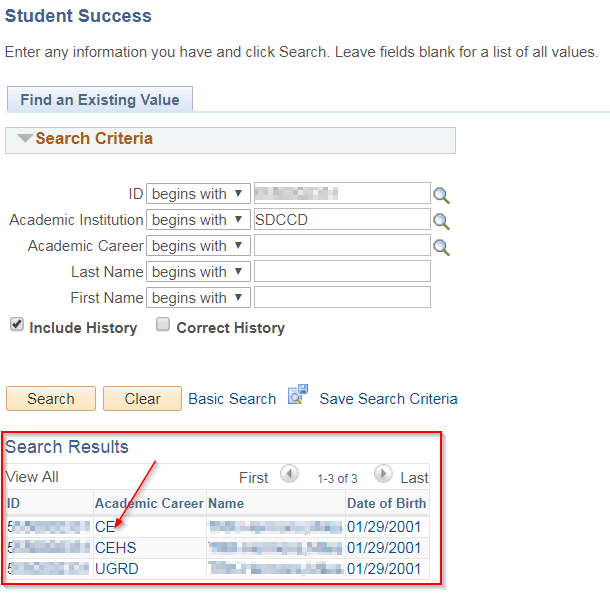
| 4. | Select the student Click on the link to select the Student and the Academic Career that you want to adjustwill be updated. This will then land on the Student Success page. |
| Step | Action |
|---|---|
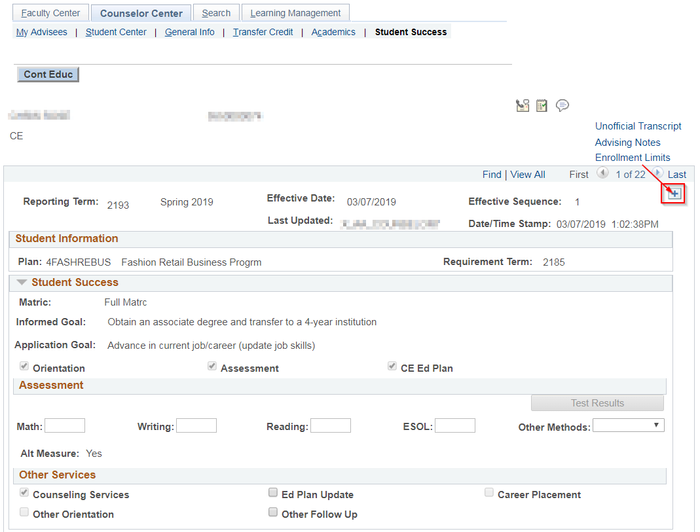
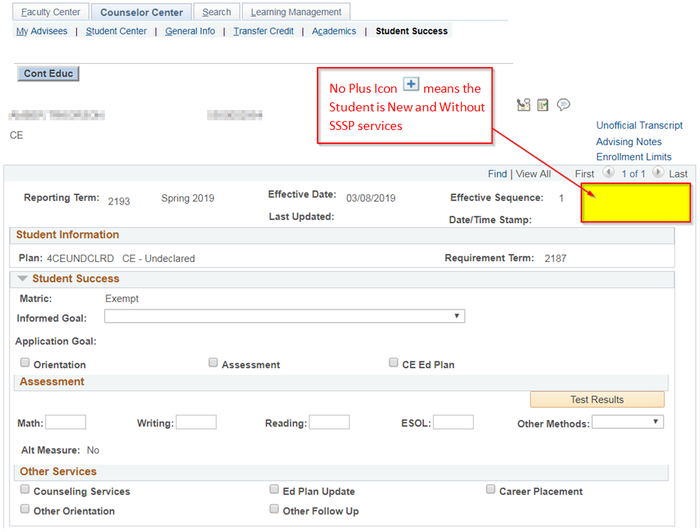
| 5. | If this is a new student without SSSP previously provided, there will be no plus icon icon  on the Student Success page above the Student Information section. on the Student Success page above the Student Information section. |


| Step | Action |
|---|---|
| 6. | If this is a returning student Click , click on the plus sign  to icon to icon |
| 7. | Review Student Information and update as appropriate. NOTE: You must ClickClick on Save“Save” at the bottom of the page to update the SSSP page before navigating to another tab . (otherwise yourafter entering all necessary information, otherwise all changes will not be saved ) |

. |
| Step | Action |
|---|---|
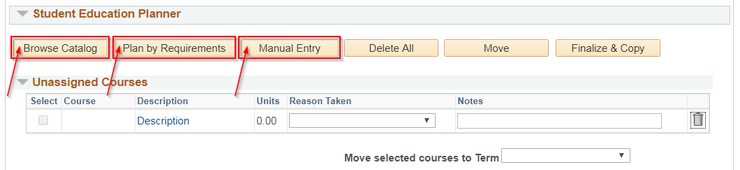
| 8. | Under the Student Education Planner section, click on the arrow to open and view. Courses can be added to the Student Education Planner by clicking either on the Browse Catalog, Plan by Requirements, or Manual Entry button. |
Browse Catalog:
| Step | Action |
|---|
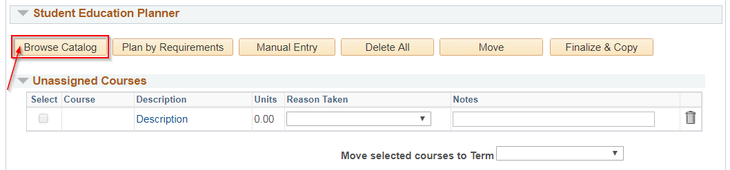
| 9a. | Click on the Browse Catalog |
button to add courses to the Planner. |
NOTE: Student must be active in order to use Browse Catalog. |
| Step | Action |
|---|---|
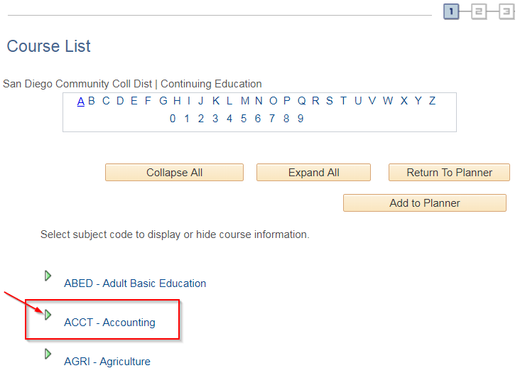
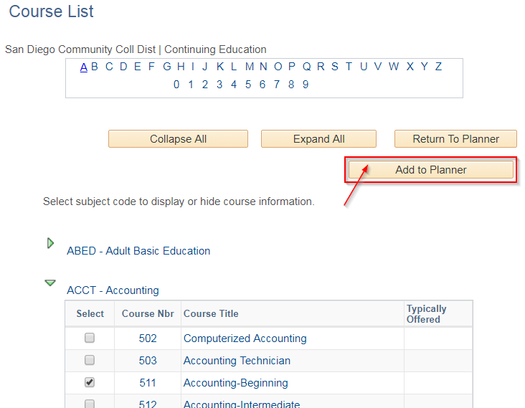
| 9b. | Select a subject |
| to pick a course from the subject course list and click the arrow to open list and view courses offered. |

| Step | Action |
|---|
| 9c. | Select |
| the |
NOTE: Under the Select column, courses with a check box indicates the course is taught only at one campus. If there is no check box, this indicates the course is taught at multiple campuses. You must click on this course to see where it is being taught.
Select the course you want by checking the select box. Then click the Add to Planner
NOTE: Student must be active in order to use Browse Catalog.

| course being added to the Planner by checking the select box. |

| Step | Action |
|---|---|
| 9d. | Then click the Add to Planner button at the top or at the bottom of the page. |
| Step | Action |
|---|
| 9e. |
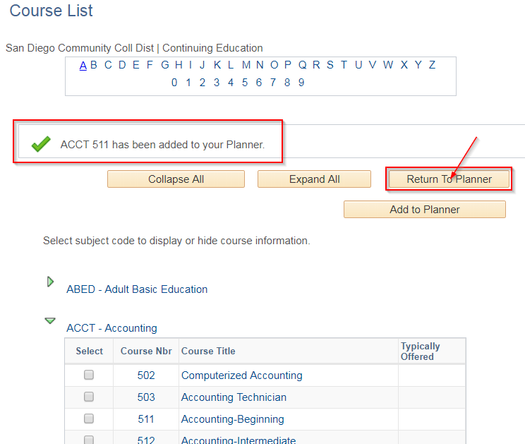
Verify the course has been added to the planner |
by noting the check mark icon |

| Step | Action |
|---|
| 9f. |
| Verify the course has been added to the Planner on the Student Success page |
| . |
| Step | Action |
|---|---|
| 9g. | A reason for taking the course |
can be added by using the Reason Taken drop down menu. Notes regarding the course can also be added (up to 62 characters). NOTE: |
The only option shown under |
the Reason Taken drop down menu that applies to CE/CEHS |
is “Major Course |

Click Finalize & Copy. This will allow the courses to appear in “My Planner” in the Student Center.
Requirements”. |

Plan by Requirements:
| Step | Action |
|---|
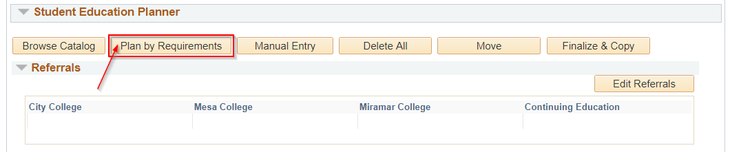
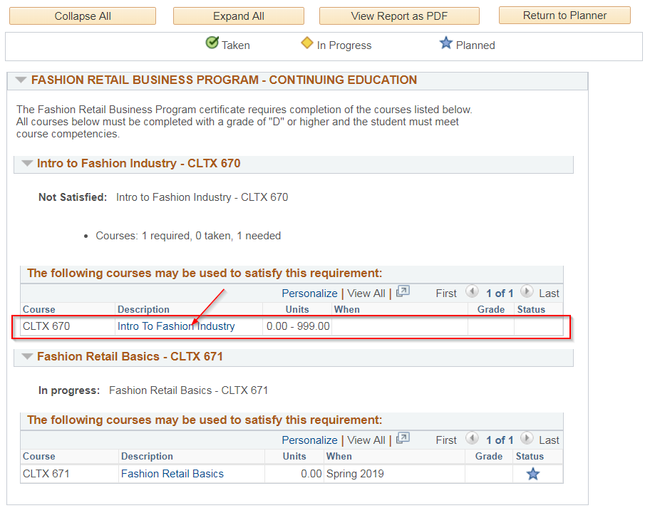
| 10a. | Click on the Plan by Requirements button to add courses to the Planner |

which will land on the What-if Scenario Result page. NOTE: Student must be active to use Plan by Requirements. |
| Step | Action |
|---|
| 10b. |

| While on the What-if Scenario Result page, click on the course description link which leads to the course details page. |
| Step | Action |
|---|
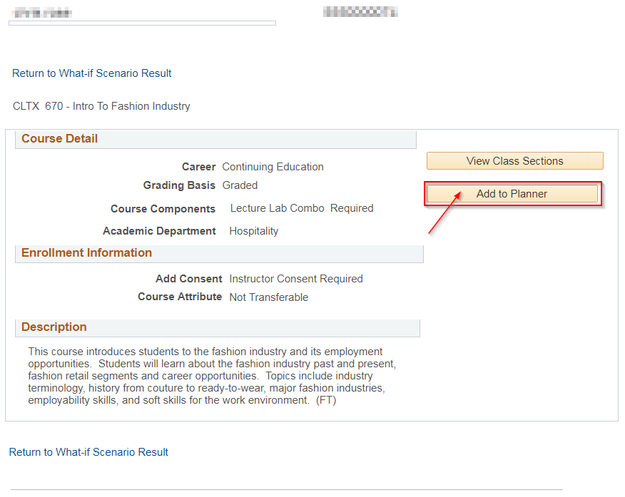
| 10c. |
| While on the course |
| details page, click the Add to Planner |
| button. |

| Step | Action |
|---|
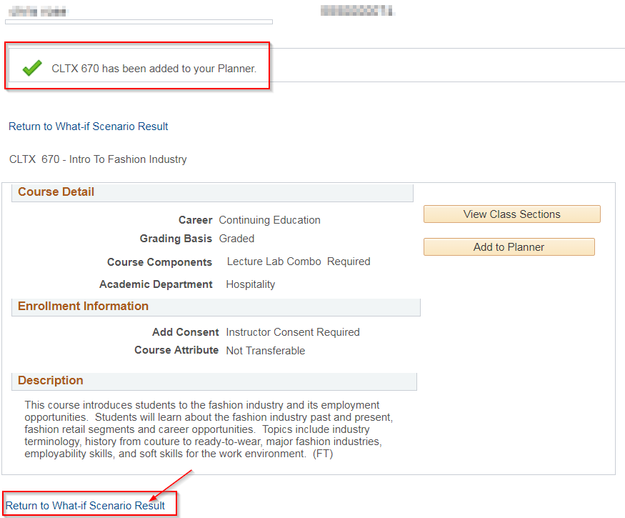
| 10d. | Verify |
the course has been added to the planner |
by noting the check mark icon |

link at the bottom of the page. |
| Step | Action |
|---|
| 10e. | Click |
| the Return to Planner |

| button at the top of the page to return to the Student Success page. |
| Step | Action |
|---|
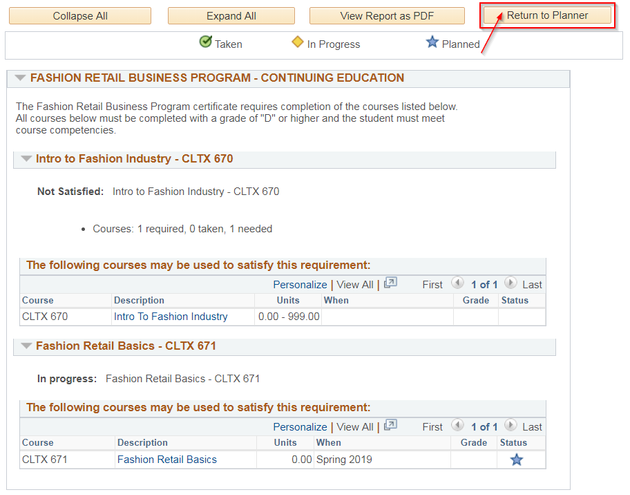
| 10f. |
| Verify the course has been added on the Student Success page |
| . |
| Step | Action |
|---|---|
| 10g. | A reason for taking the course |
can be added by using the Reason Taken drop down menu. Notes regarding the course can also be added (up to 62 characters). NOTE: |
The only option shown under |
the Reason Taken drop down menu that applies to CE/CEHS is “Major Course Requirements” |
. |

Click Finalize & Copy. This will allow the courses to appear in “My Planner” in the Student Center.
Manual Entry:
| Step | Action |
|---|
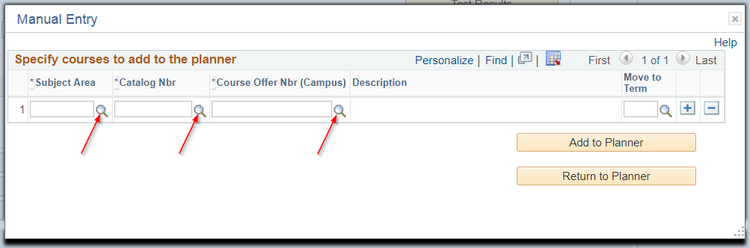
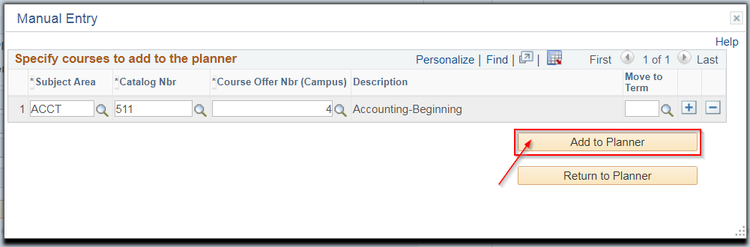
| 11a. | Click on the Manual Entry button to add courses to the Planner manually. |

NOTE: Student must be active to use Manual Entry. |

| Step | Action |
|---|
| 11b. | Enter the |
*Subject Area, *Catalog Nbr and the *Course Offer |
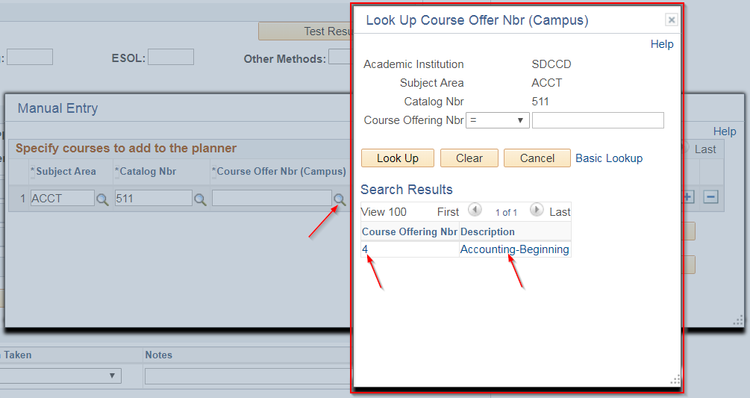
NBR (Campus)directly into the field or by clicking on the magnifying glass |


icon |

| Step | Action |
|---|
| 11c. |


| After all fields are entered, click the Add to Planner button. |
| Step | Action |
|---|
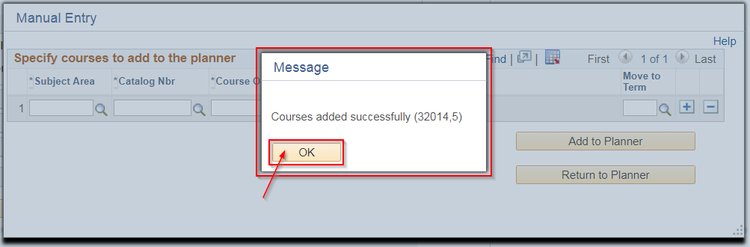
| 11d. |
| A message that reads "Courses added successfully" will pop up to verify the |
| course(s) successfully added to the Planner, click the OK button. |

| Step | Action |
|---|
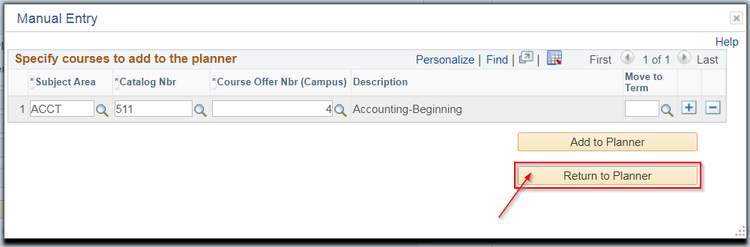
| 11e. |
| Click Return to Planner |

| button to return to the Student Success page. |
| Step | Action |
|---|
| 11f. |
| Verify the course has been added on the Student Success page |
| . |
| Step | Action |
|---|---|
| 11g. | A reason for taking the course |
can be added by using the Reason Taken drop down menu. Notes regarding the course can also be added (up to 62 characters). NOTE: The only option shown under the Reason Taken drop down menu that applies to CE/CEHS |
is “Major Course Requirements” |
. |

| Step | Action |
|---|

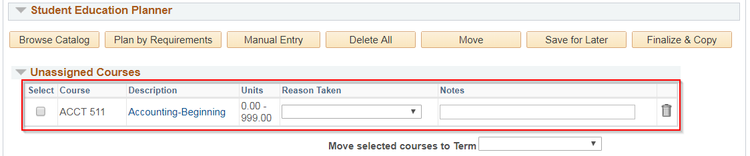
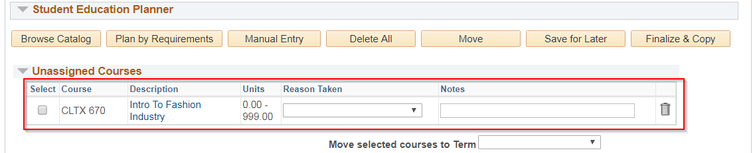
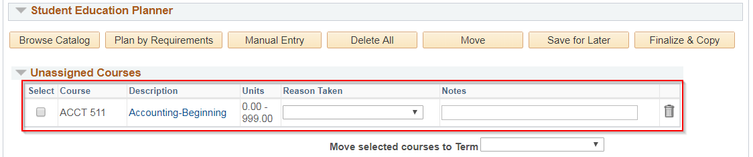
Unassigned Courses:
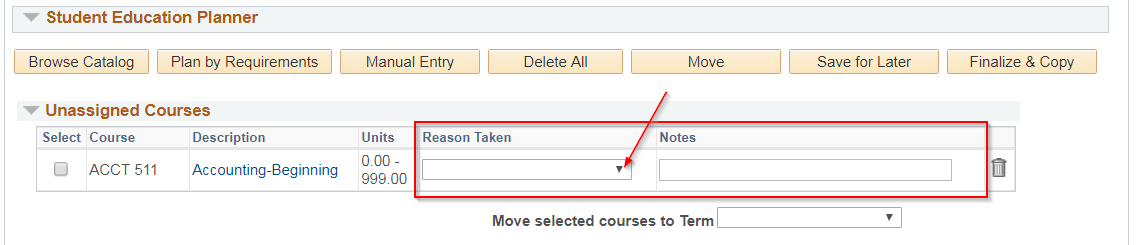
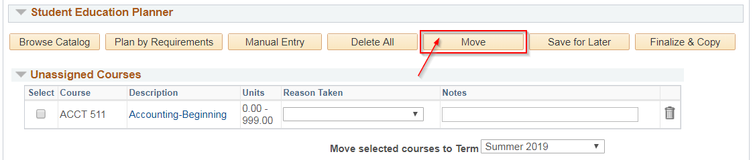
| 12. | Under the Student Education Planner section, any unassigned course can be moved to a specific term by checking the select box next to the unassigned course and then by selecting the appropriate term from the Move selected courses to Term drop down menu. |


| Step | Action |
|---|
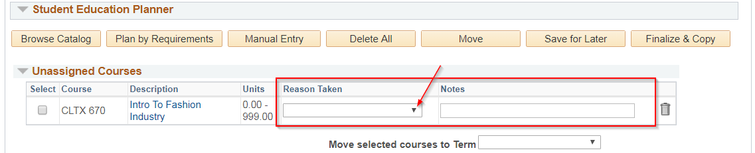
| 13. |
You can also select a Reason Taken from the Reason Taken dropdown menu.

| Click on the Move button once term is selected. |
| Step | Action |
|---|
| 14. |
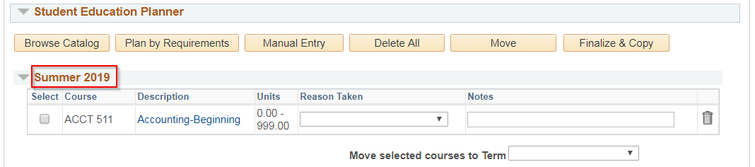
| Verify the course |
| has been added to the appropriate term. |

| Step | Action |
|---|
| 15. |

You will notice your courses have been moved to the specified term and if you added a Reason taken and/or notes they should also appear attached to the course.

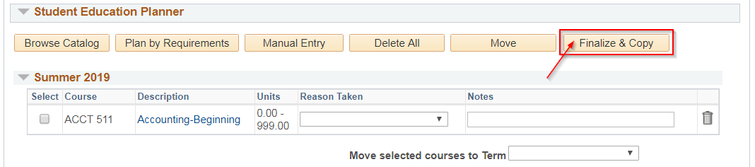
Once the Finalize & Copy button is clicked, all buttons will become grayed out. In order to make any further changes on the SSSP page, click on the plus icon You must click the Finalize & Copy button to save the whole updated Student Success page. NOTE: Clicking Save will only post actions to the SSSP/Counselor’s Planner, NOT to the Student’s Planner. | |
| 16. | To save all updates/changes, click the Finalize & Copy button. |

| Step | Action |
|---|
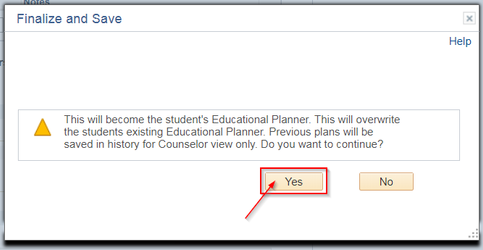
| 17. | After clicking the Finalize |
& Copybutton, a Finalize and Save confirmation window will pop up, click Yes to confirm. |

| Step | Action |
|---|
| 18. | End of job aid. |