...
This Job Aid will go over the process necessary to create a new class section.
| Step | Action |
|---|---|
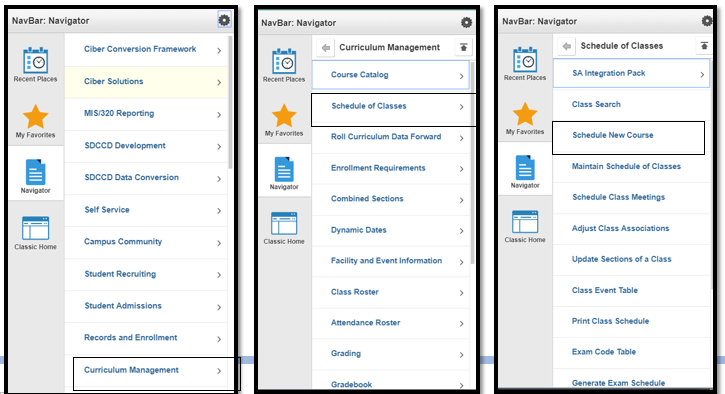
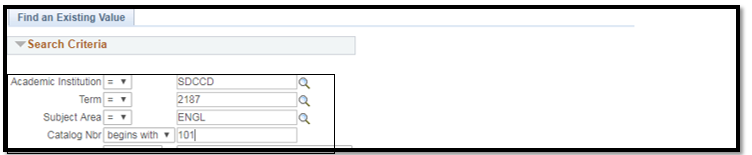
| 1. | Click on the Compass Icon Navigate to Curriculum Management -> Schedule of Classes -> Schedule New Course. Type in the corresponding information in the Search Criteria section to create a hybrid course. Click Search and click to choose corresponding course. |


| Step | Action |
|---|---|
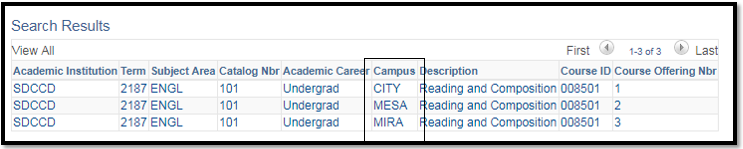
| 2. | Select course by Campus. Multiple options may be listed below. |
| Step | Action |
|---|---|
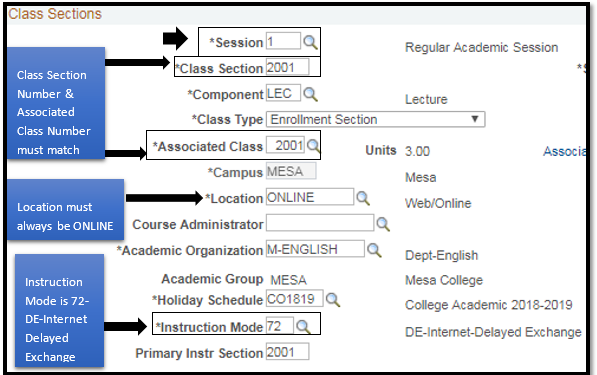
| 3. | On the Basic Data tab under Class Sections, select the Session. (Regular is a standard 16 week session). If the Session needed is not listed, select DYN, and then enter in the Start/End Dates. (Ensure dates match under Meeting Pattern in the Meetings Tab) |
| 4. | Update the Class Section *Associated Class must always match the Class Section Number. *Location defaults to ONCAMPUS. Click the magnifying glass to select ONLINE option. Verify the correct department under Academic Organization. *Instruction Mode defaults to P. Click magnifying glass and select 72 (DE-Internet-Delayed Exchange) |
| Step | Action |
|---|---|
| 5. | Navigate to the bottom of portion of the page towards Class Attributes. On the top Right, Click Last hyperlink. To add an additional class attribute, click the + (plus) sign at the end of the last listed Class Attribute row. On the new row- Enter ‘SPDG’ for Special Designator under the *Course Attribute. Enter ‘ONLINE’ for Fully Online Course under *Course Attribute Value.Navigate to the bottom of portion of the page towards Class Attributes. On the top Right, Click Last hyperlink. To add an additional class attribute, click the + (plus) sign at the end of the last listed Class Attribute row. On the new row- Enter ‘SPDG’ for Special Designator under the *Course Attribute. Enter ‘ONLINE’ for Fully Online Course under *Course Attribute Value. |

| Step | Action |
|---|---|
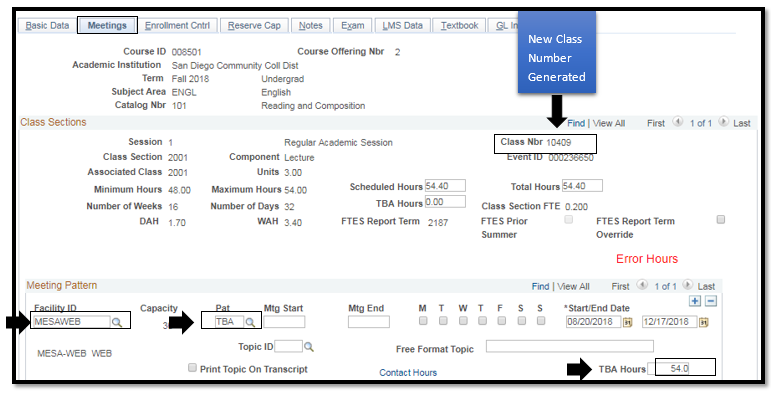
| 6. | Click on the Meetings Tab to enter the Meeting Pattern. Navigate to the Meeting Pattern section Under Facility ID enter the first four letters of the campus and ‘WEB’ after. (i.e. MIRAWEB, CITYWEB, MESAWEB) Enter “TBA” under Pat box. Enter class hours in TBA Hours box. Click Save to generate a new Class Nbr. |
| Step | Action |
|---|---|
| 7. | End of job aid. |