Creating Payment Plans (Deferments)
Creating Payment Plans (Deferments)
Label | Description |
|---|---|
| Business Process | Deferment |
| Module | Student Financials |
| Prerequisites | Student must have a balance due. |
| Description | This Job Aid illustrates how to create Payment Plans (Deferments). |
Instructions:
Step | Action |
|---|---|
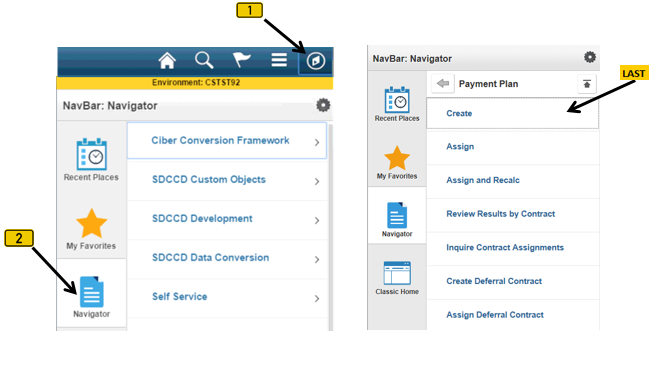
| 1. | Click on [ |


| Step | Action |
|---|---|
| 2. | Click the “Add a New Value” [ |

| Step | Action |
|---|---|
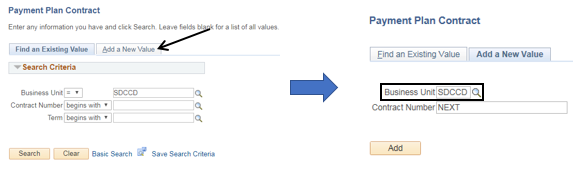
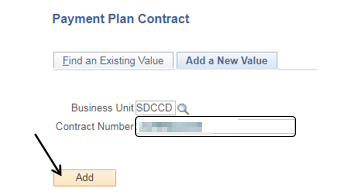
| 3. | Note: The system assigns a Contract Number of “NEXT”. You need to create a new contract number. Create a new contract number by using the following naming convention: <Semester><the campus letter: “M” = Mesa , “C” = City, “R” = Miramar><last 5 numbers of student’s ID> Contract Number will look like: “2175M22223”. [No dashes and no spaces] Click the “Add” button [ ] ] |
| Step | Action |
|---|---|
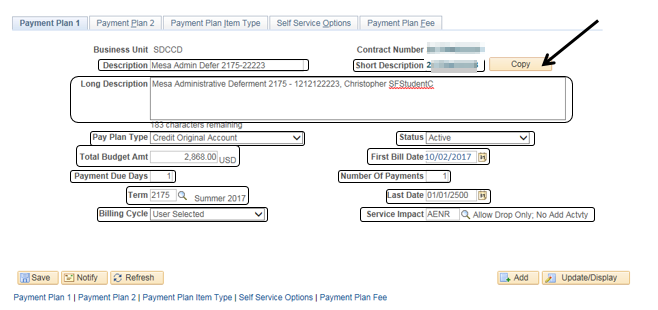
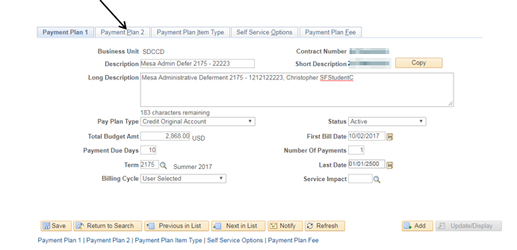
| 4. | Fill out all of the necessary information: Description = Naming convention follows: <campus> <”Admin”> <”Defer”> <semester> <”-“> <last 5 digits of student’s ID#> Mesa Admin Defer 2175 – 22223 Short Description = Copy the Contract Number Long Description = “Mesa Administrative Deferment” (Semester)”2175”; (Dash) “ – “; (Student ID #) “1212122223” ; (student’s name) “Christopher SFStudentC” Pay Plan Type = “Credit Original Account” Total Budget Amt = Total amount being Deferred Payment Due Days = “1” Term = Current semester fees are being deferred for. [“2175” for this example] Billing Cycle = “User Selected” Status = “Active” First Bill Date = Approved date based on Deferment paperwork from Student Affairs Number of Payments = 1 Last Date = (Always Use) “01/01/2500 “ Service Impact = “AENR” |
| Info: | Note: If you want to copy an existing deferral contract, you can click the “Copy” button to access the Copy Contract page. You may copy all contract setup information except for term and date information |
| Step | Action |
|---|---|
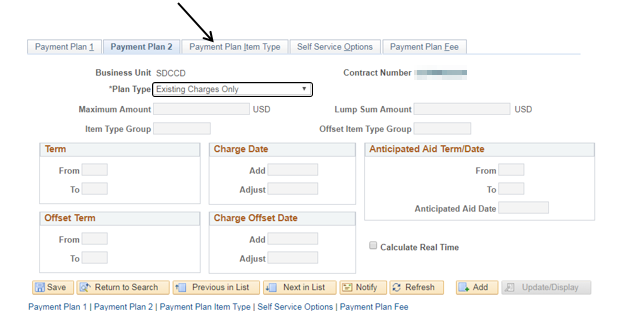
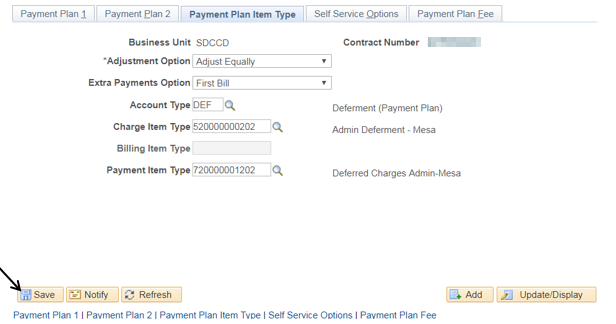
| 6. | Click the “Payment Plan 2” [ |

| Step | Action |
|---|---|
| 7. | In the “Payment Plan 2” page (tab), verify that the “*Plan Type” field = “Existing Charges Only” Click the “Payment Plan Item Type” [ ] page (tab) ] page (tab) |
| Step | Action |
|---|---|
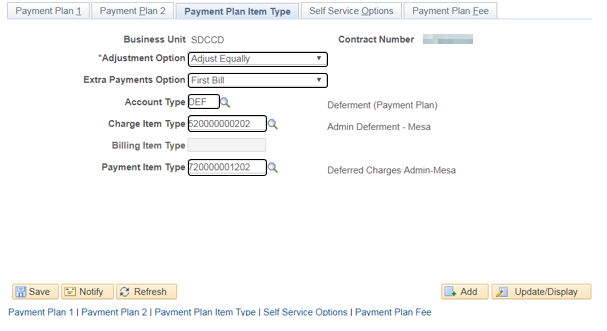
| 8. | Enter all the necessary information: *Adjustment Options = “Adjust Equally” Extra Payment Option = “First Bill” Account Type = Click the magnifying glass [ Charge Item Type = See step 9 Payment Item Type = See step 10 |

| Step | Action |
|---|---|
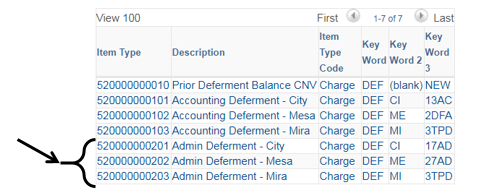
| 9. | For the “Charge Item Type” field [], click the magnifying glass to display your choices. Click the appropriate Description. |
| Step | Action |
|---|---|
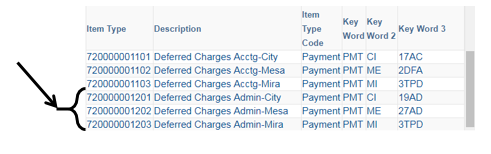
| 10. | For the “Payment Item Type” [], click the magnifying glass, scroll to the bottom, and choose the appropriate Description. |
| Step | Action |
|---|---|
| 11. | When all the fields are filled out, click the “Save” button. Note: You don’t need the “Self Service Options” page (tab) or the “Payment Plan Fee” page (tab). |
| Note: |
|---|
| To Assign a Deferment (Payment Plan), see JOBAID: Deferment (Payment Plan) - Assigning |
| Step | Action |
|---|---|
| 12. | End of job aid. |