This job aid will walk you through the process to review EOPS applications.  This includes accepting and rejecting them.

(warning) Only people with appropriate security access will be able to follow this process.

Step
Action
1.

If you're currently on the EOPS/CARE MIS page, it's advised that you open a new window so you can work in both screens:

Navigate to → Reporting Tools → Query → Query Viewer

Step
Action
2.When prompted for the report name, type in "X_FA_EOPS_APP_REVIEW"

Step
Action
3.Click on "Favorite" under "Add to Favorites" to save this query for later use.

Step
Action
4.To run the report, click on "HTML" to run the report


Step
Action
5.

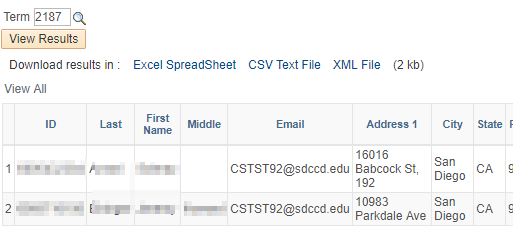
For the term, type in one of the following values. 

2197 = Fall 2019

2203 = Spring 2020

2205 = Summer 2020

Enter in your Campus: CITY/MESA/MIRA


Step
Action
4.

Click on the  button to run the query.  Users can also download the query to Excel, CSV or an XML file by clicking on the appropriate link.
Step
Action
5.

Next Steps:


How to Accept an EOPS Application

Step
Instructions
1

When you are ready to take action on an application:

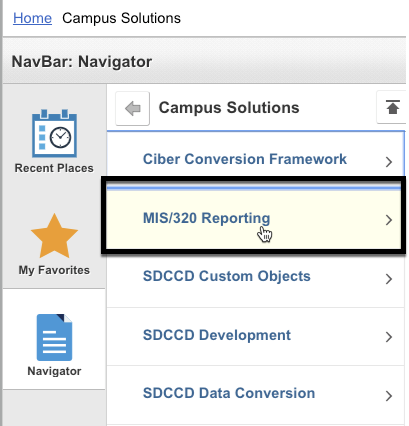
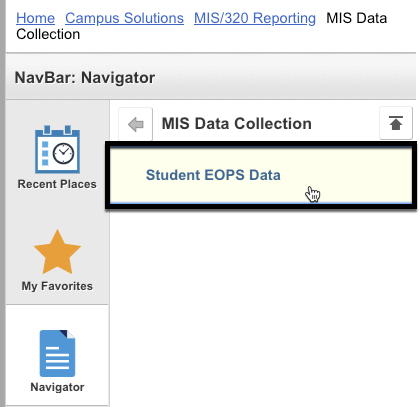
Navigate to: MIS/320 Reporting → MIS Data Collection → Student EOPS Data

2

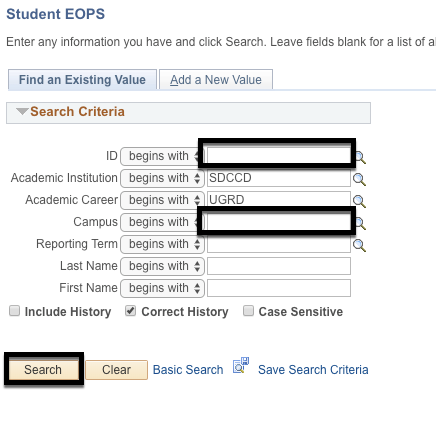
You will be prompted to search for a person.  Type in the student's ID number, the campus, and the reporting term the student applied for then click on "search"

3

You should see the EOPS page for the semester appear.


4

To process the application, click on the 3C Status tab and look for the XAPPN checklist item.  The status should be "Received" which indicates the application has been received.

Click on the XAPPN checklist item code.

5

You will be brought to the checklist item in Campus Solutions.  In the Status box, change the status to "Completed" to indicate the student is provisionally accepted and should be invited to orientation.

6Click on "Save"
7

To verify, click on "Return to Search" and bring up the student record again to see the updated information.

click on the EOPS Information tab to enter in appropriate comments if needed.

How to Reject/Decline an EOPS Application

Step
Instructions
1

When you are ready to take action on an application:

Navigate to: MIS/320 Reporting → MIS Data Collection → Student EOPS Data

2

You will be prompted to search for a person.  Type in the student's ID number, the campus, and the reporting term the student applied for then click on "search"

3

You should see the EOPS page for the semester appear.


4

To process the application, click on the 3C Status tab and look for the XAPPN checklist item.  The status should be "Received" which indicates the application has been received.

Click on the XAPPN checklist item code.

5

If the student is ineligible, follow these steps:

In the XAPPN checklist, click on the XAPPN link

6

Mark the application from "Received" to "Cancelled"

7

In the EOPS page, click on the checklist iconto create a new checklist for the student.  This is located in the top right section of the page. 

You will be prompted to enter in your checklist in a new window.  

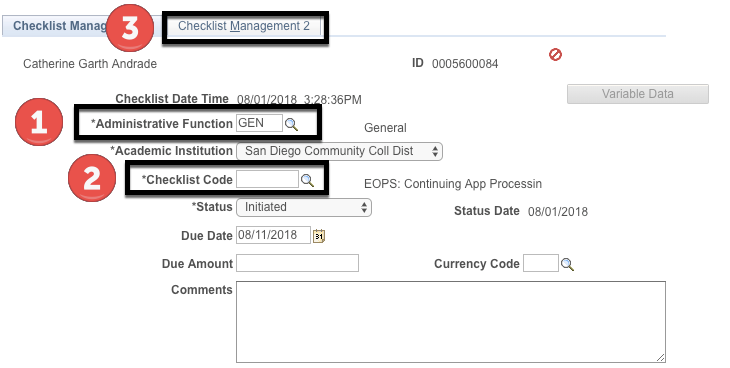
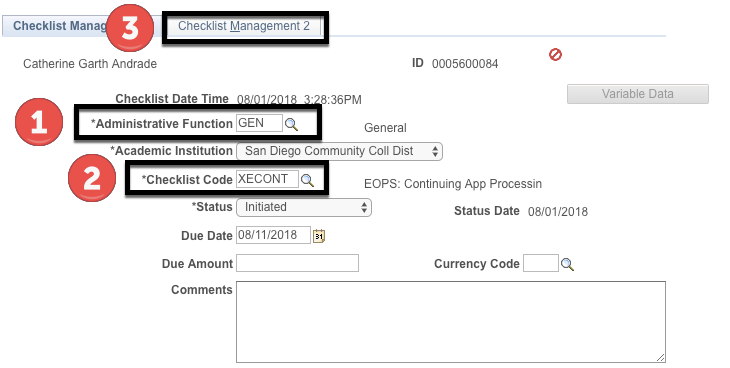
  1. Enter in GEN as the administrative functions
  2. Type in XEDENY as the checklist, this is the EOPS: Ineligible checklist
  3. Click on Checklist Management 2 to indicate the reasons the application was denied.
8

Next to checklist item, click on  and choose the reason why the application was rejected.  You may add more than one reason.

(warning) It is important that you mark the status as completed if the application is not eligible.

Reasons are listed below:

  • XENROL - Not Enrolled in Min. Req Units
  • XNEDDI - No Educational Disadvantage
  • XOVERU - Completed Max Number of Units
  • XNRES - Not a California Resident


9When you save, this will flag the student to be sent the ineligible email.

How to Request More Documentation

StepInstructions
1

Navigate to: MIS/320 Reporting → MIS Data Collection → Student EOPS Data

2

You will be prompted to search for a person. 

3

You should see a list of values.  Look for the appropriate Reporting Term and click on that row

4

In the EOPS page, click on the checklist iconto create a new checklist for the student.  This is located in the top right section of the page. 

You will be prompted to enter in your checklist in a new window.  

  1. Enter in GEN as the administrative functions
  2. Type in XEODOC as the checklist, this is the EOPS: Documentation Request checklist
  3. Click on Checklist Management 2 to select which documents you need
5

Next to checklist item, click on  and select which documents you are requesting.  You may select more than one document.

Click on Save

6

To verify, click on "Return to Search" and bring up the student record again to see the updated information.

click on the EOPS Information tab to enter in appropriate comments if needed.

The student will be flagged to submit documentation in order to complete their application.